Correctly configured access control profiles allow you take full control over when and where drivers can charge and how much they should be paying to do so.
Contents:
- Access Tab
- Access Control Profiles Home
- Profile Name
- Public Access Settings
- Adding Tariffs
- Time Availability
- Add Users
- Add Charging Sites & EVSEs
- Review Charging Sites / EVSEs & Save
1. Access Tab
To get started, click the arrow beside "Access" from the navigation menu to open up that section.
Click "Access Control Profiles" from the expanded menu.

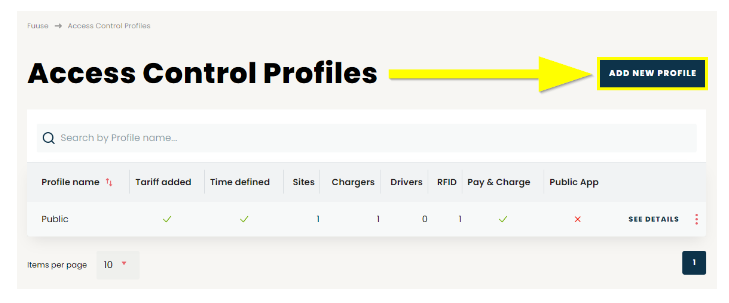
2. Access Control Profiles Home
Here you will find all previously created profiles listed. If you have a lot of profiles, you can use the search bar to find specific ones if needed.
To add a fresh access control profile, click the "Add New Profile" button.
3. Profile Name
Start off your new profile by giving it a unique name. While this can be anything you want, it is wise to make it something distinguishable that speaks to the intention of this particular profile. This will also help tell one profile from another more easily if you intend to create many.

4. Public Access Settings
Here you can specify how to handle public access to any sites and chargers associated with this profile.
By default, these options are unchecked meaning only named drivers / driver groups / vehicles / RFID's will have access.
Check the first box if you wish to allow members of the public to use sites and chargers via a web browser.
Check the second box to allow members of the public to use chargers via contactless Payment (please speak to your account manager or Fuuse Support if you need to link a contactless terminal with your chargers).
Check the third box to allow members of the public the Fuuse mobile app to charge.
Remember - These particular settings ONLY apply to anonymous members of the public and not your named drivers.

When creating a new access control profile please also tick the 'Activate this profile' box to ensure your profile is activated and drivers are able to use the tariff selected.
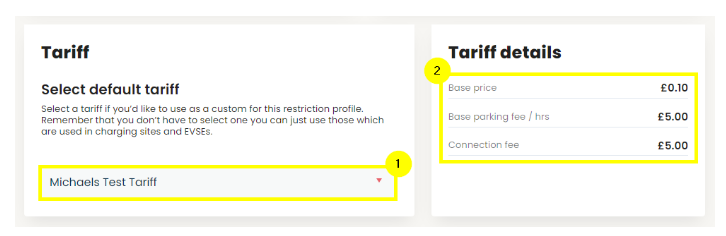
5. Adding Tariffs
Here you can add a tariff to your profile. This is not a requirement for the creation of the profile. Any access profile without a tariff assigned will default to the tariff set on the sites and EVSEs you assign to the profile.
- Use the drop down to select a previously created tariff. You can also choose to create a new tariff from here if required.
- With a tariff selected, the details of it will display here. Switching between tariffs will automatically update these details.
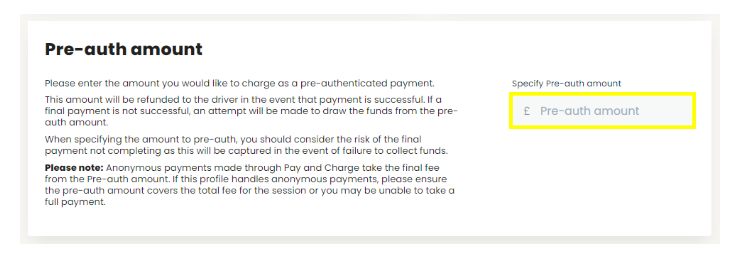
When using tariffs, you can also specify the pre-authorisation payment amount using the box provided.
This is not required if you are not applying a tariff to the profile.
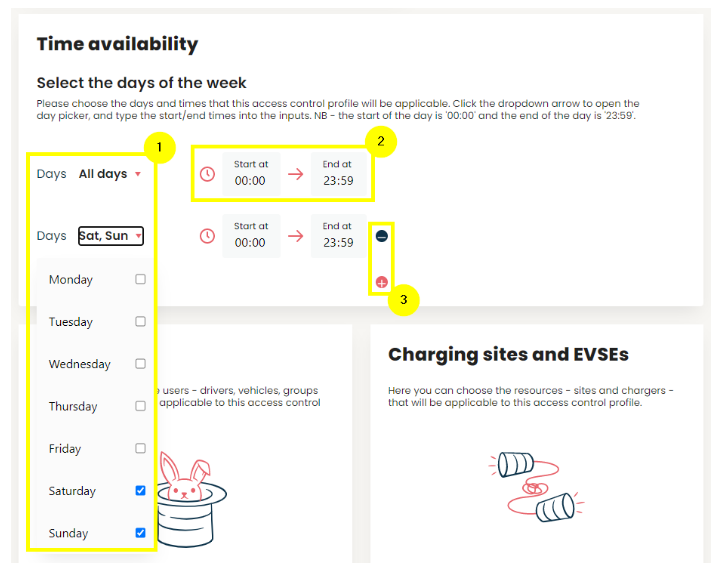
6. Time Availability
Here you can set a global time frame for when all charge sites and EVSEs managed by this profile can be accessed and used.
- Use the "Days" dropdown to select which days of the week are to be used. By default this will be all days. Click the check boxes to select certain days or a combination of them.
- Click the time under "Start at" and "End at" to alter the specific time frame. By default this is set from midnight to one minute to midnight covering a 24 hour period.
- Use the plus button to add more time frame options. The minus button button besides each one can be used to delete them.
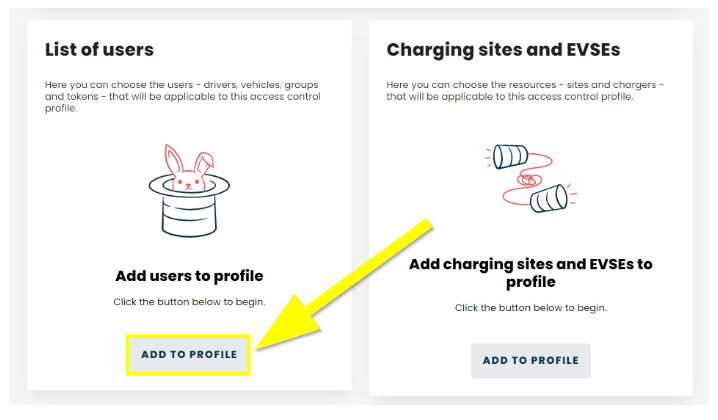
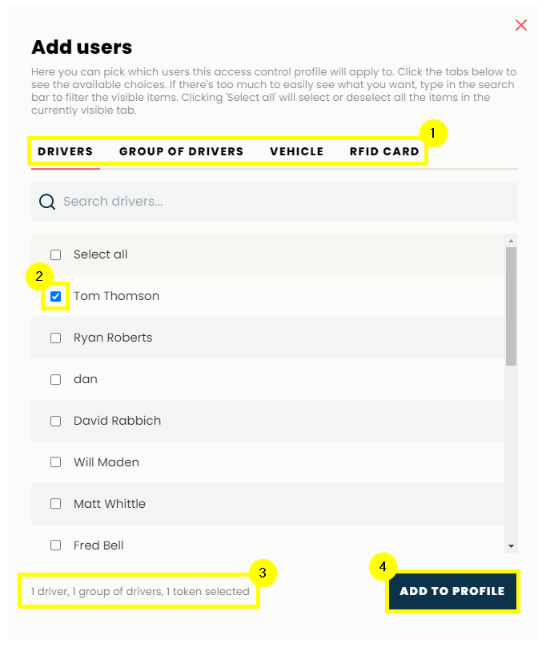
7. Add Users
To begin adding users, drivers, driver groups, vehicles and RFID tokens, click the "Add to Profile" button in the "List of users" section.
- Switch between the different type of user you want to add using the tabs provided here. Your options include:
- Drivers
- Groups of Drivers
- Vehicle
- RFID Card - Select the driver / group / vehicle / RFID card using the check boxes provided. Use the search box at the top if you have a lot of users and want to find a specific one.
- The summary at the bottom shows what is currently selected across all of the tabs.
- Once you have added all users required, click the "Add to Profile" button.
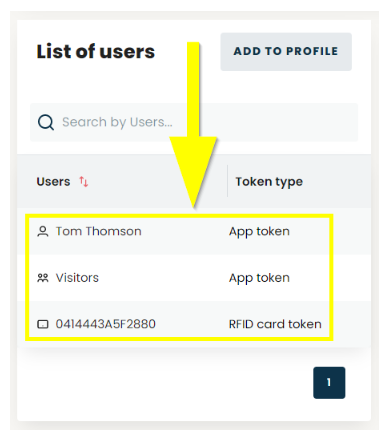
You will now be returned to back to the main Access Control Profiles creation screen.
Your newly added users will display in the list, as shown below.
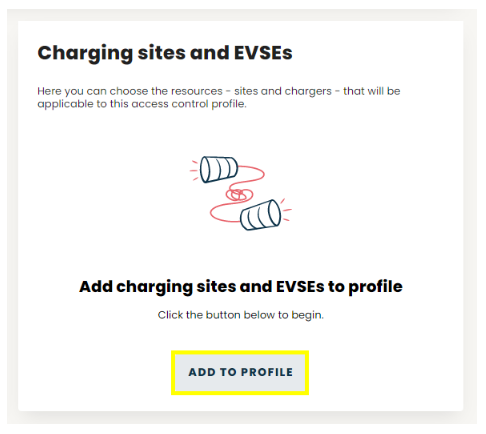
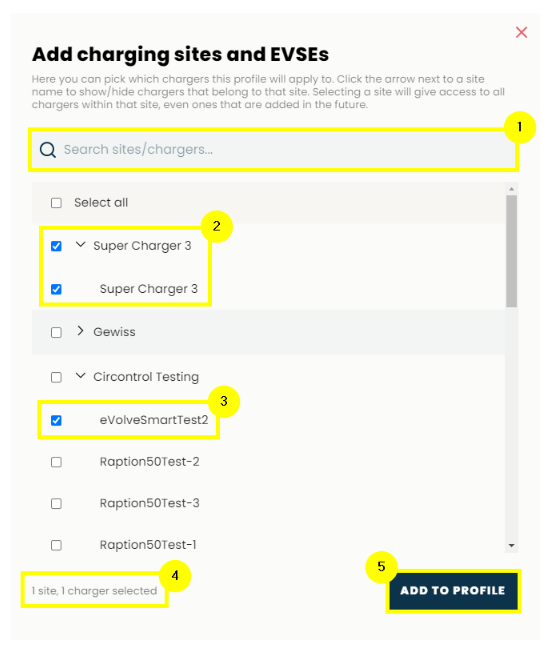
8. Add Charging Sites & EVSEs
To begin adding charging sites and EVSE's that you have already created in Fuuse, click the "Add to Profile" button in the "Charging sites and EVSEs" section, as shown below.
- If you have a large number of sites / EVSEs, you can use the search box provided to find specific ones.
- The information here is displayed in two levels - The top level is the charging site. Clicking the arrow beside a charge will drill into that site and reveal the second level, which consists of all EVSEs at that site. Clicking the check box next to the site will select all EVSEs at that site.
- You can also select individual EVSEs within a site by clicking its checkbox if you don't wish to use them all for this profile.
- The summary at the bottom will display the combination of sites and chargers selected. "1 site" implies the site plus all chargers in it have been selected. "1 charger" implies an individual EVSE at a site with multiples has been selected.
- With all of your sites and chargers added, click the "Add To Profile" button to lock your choices in.
9. Review Charging Sites / EVSEs and Save
You will be returned to the main profile creation screen once more. Any charging sites and EVSEs that you just added will now display in the designated section, as shown below.
Finally, if you are happy with your access control profile configuration, click the "Save Profile" button to finish up.
