Adding a new charging site to Fuuse is an easy four-step process, which takes just a few minutes to complete as long as you have all the relevant information to hand.
Adding a new charging site to Fuuse is an easy four-step process, which takes just a few minutes to complete as long as you have all the relevant information to hand. Don't worry if you don't though, as this guide will inform you of everything you need and how to find it.
Contents:
1. General Information
Log in to the web portal at app.fuuse.io to get started.
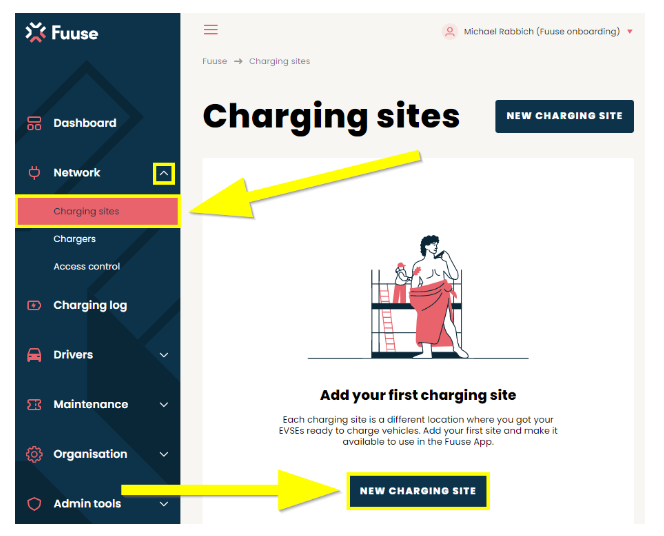
Click the arrow besides "Network" in the side menu on the left to drill into that section. Select "Charging Sites" from the expanded menu.
If you are adding your first charging site, click the "New Charging Site" button, as shown below.
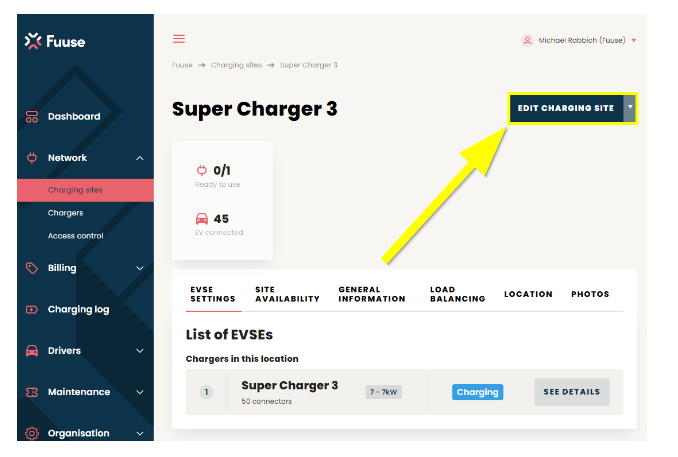
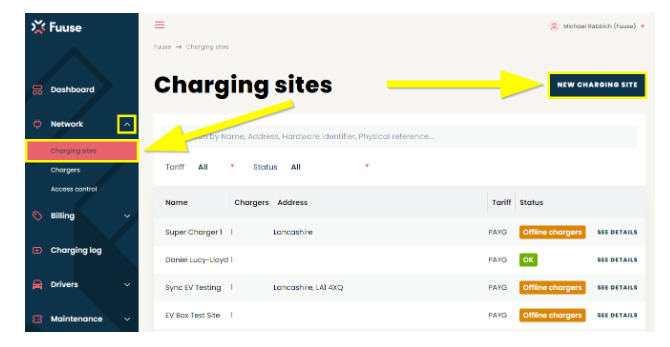
If this is not your first charging site, a new one can be added by navigating to the charging sites screen, as above, but instead clicking the "New Charging Site" button at the top of the page.
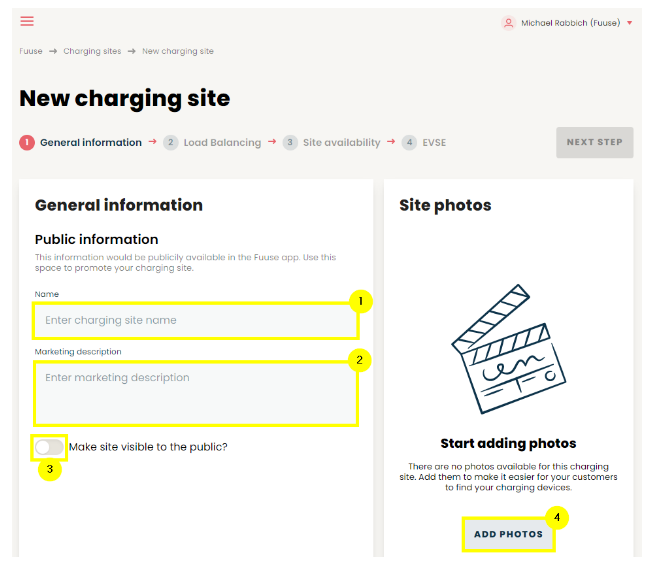
First we need to enter some general information about the new site:
1. Name - Enter the site name as you wish it to be be displayed to drivers.
2. Marketing Description - Add a marketing description, which can give more details about the benefits of the site.
3. Visible to the Public? - Use this to toggle whether the site should be visible to the public or not.
4. Site Photos - Images of the site can be added either to help your customers find your chargers or to give a visual representation of the chargers used to help customers decide if they are suitable.
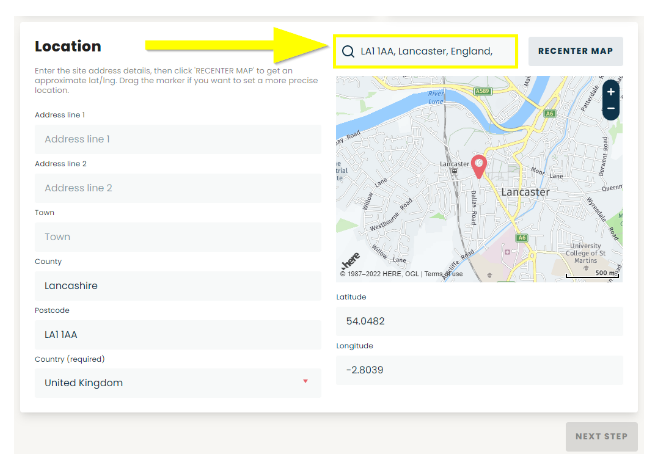
Next, enter the location of your site. Either type the address into the search address box to automatically find the site and autofill as many of the fields as possible, or manually enter the address details in the boxes provided.
Click the "Recenter Map" button to populate the latitude and longitude of the postcode you have entered.
Once you have completed the site location details, click the "Next Step" button at the top or bottom of the page to continue.
2. Load Balancing
Load balancing is an optional feature that allows you to set a limit on the amount of power available for chargers at your site. You can use this to ensure your site operates at safe levels at times of peak use, as it will limit charge rates when the limits stated are approached.
You can skip to the next step if you do not wish to enable load balancing for your site. You can also edit a site at a later date and switch this feature on:
1. Load balancing Availability - Use the toggle switch to turn this feature on and off. Once turned on, more configuration options will appear, as shown in the example below.
2. MPAN (Electric meter number) - Your MPAN (meter point administration number) is a 13 digit number than can be found on your bills or other documentation from your electricity provider. If you are unable to find it, contact your supplier and they should be able to pass it on to you.
3. Set EV Priority - Load balancing works by limiting the charge rates of those currently using the chargers at your site once the stated max amps are reached. Here you can select whether the first or last driver charging will be given priority when balancing occurs.
4. Power Supply - Please indicate whether your site uses a single phase or three phase power supply.
5. Enter Complex Requirements - Use this to toggle even more advanced features. These will be explained below.
6. Power Available to Chargers - Here you can set the maximum power available to all chargers on your site in amps.

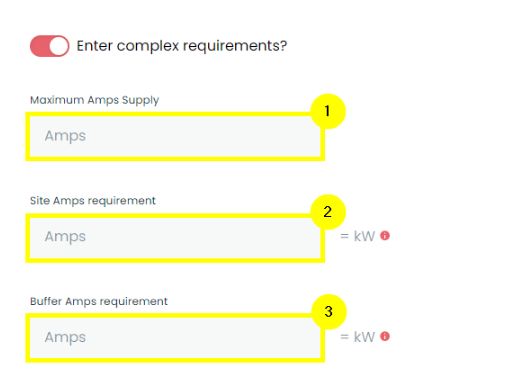
Complex Requirements
If you activate the toggle for "Enter complex requirements" you will find three optional variables that can be configured to your needs:
1. Maximum Amps Supply - This represents the site's maximum capacity, with respect to how much you want to limit it to or simply the actual maximum you know is available.
2. Site Amps Requirement - This is how much power is used by everything else on the site.
3. Buffer Amps Requirement - This allows you to withhold a certain chunk of power which, combined with your maximum amps supply, gives you a safety cushion to help prevent extended periods of high drain.
After filling in these three fields, the system will inform you how much power will be left for chargers to use in amperes and kilowatts.
Once you are happy with everything you have entered, click the "Next Step" button at the top or bottom of the screen to continue.
3. Site Availability
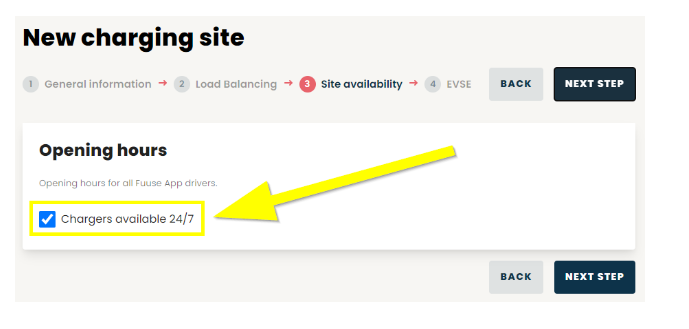
Now we can set the site opening hours, stating when a driver can gain access to the site to charge their vehicle.
If your site is open 24 hours a day, 7 days a week, simply check the "Chargers available 24/7" tick box and click "Next Step", as shown below.
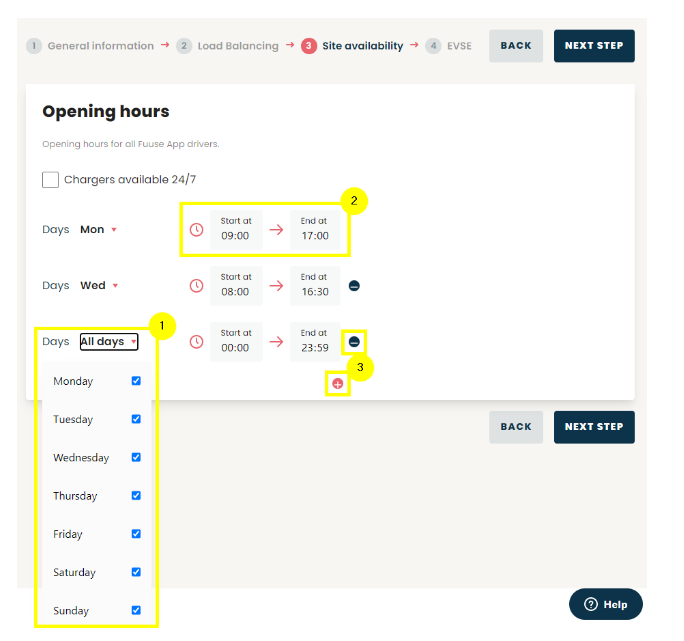
If you need to set specific opening times on a day-by-day basis, un-check the "Chargers available 24/7" button to view the additional options shown below.
1. Days - Use the drop down to select what days you want your site to be open. You can use single days, groups of days or simply all of them.
2. Start at / End at - This defines the time frame the site will be open for this particular day or group of days.
3. Add & Remove - Click the minus button to remove one of your created time frames. Use the plus button to add a new one.
Once you have set the site opening hours to meet your needs, click the "Next Step" button to move to the final stage of site setup.
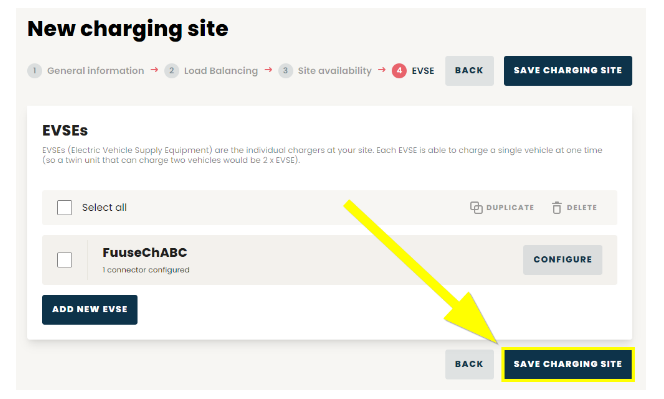
4. EVSE
This section allows us to add EVSEs to the site, where drivers can charge their vehicles.
If you plan to add your EVSEs at a later time, you can click the "Save Charging Site" button now to save the information entered so far and return to your list of charging sites. You have now completed the process of creating your new site and will be able to add EVSEs at your convenience by editing the site and following the steps below.
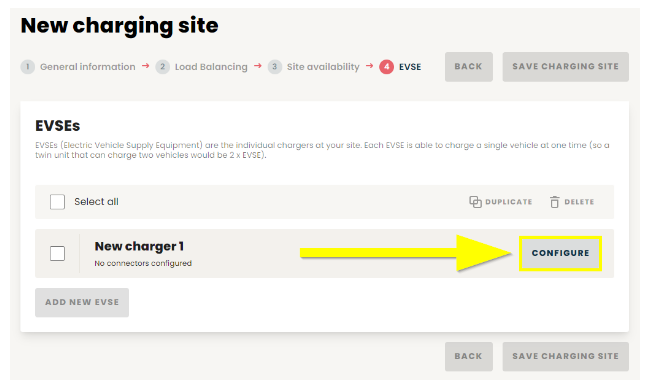
To add an EVSE now, click the "Add First EVSE" button in EVSEs section, as shown below.

This will create a new blank EVSE on the site.
Click the "Configure" button to expand the EVSE details and complete the required information.
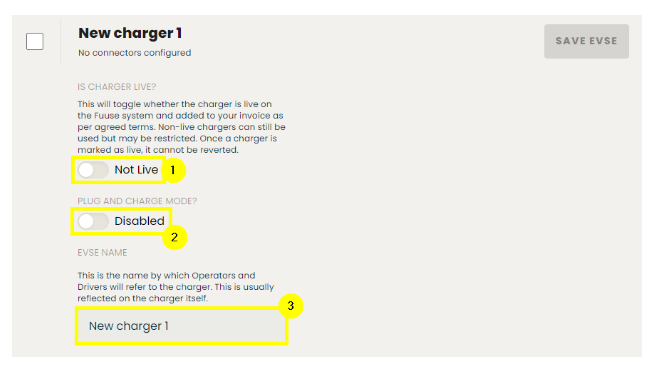
The details of your first charger can be added here:
1. Is Charger Live? - As stated in the portal, this will toggle whether the charger is live on the Fuuse system and added to your invoice as per agreed terms. Non-live chargers can still be used, but may be restricted. Once a charger is marked as live, it cannot be reverted.
2. Plug & Charge Mode? - Also known as "free vend mode", which opens the charger up for all drivers. As soon as a vehicle is plugged in to the charger, a "Start charging" command will be sent. Any sessions will be anonymous and free.
3. EVSE Name - All chargers connected to Fuuse have a unique name, not just amongst the chargers you manage, but out of every single charger on the platform, so bear this in mind when creating them. Using some part of your brand name is the best way to ensure the names are unique.
Charger names must be no more than 16 characters long and contain:
- Alphanumeric characters (ABC123)
- Hyphens ( - )
- Underscores ( _ )
Your charger name must NOT contain any special characters or spaces as it will be used for the web charging URL.
Charger names will also be saved in the case you originally enter them within the Fuuse platform itself, even though they are not functionally case sensitive. For example, the charger name could be entered as:
- fuusecharger01
- FUUSECHARGER01
- FuuseCharger01
Also consider the length of your charger name to ensure it allows room for growth as your operation adds more chargers. If we used the charger name "FUUSECHARGER0000", the four digits at the end allow for a potential 10,000 unique combinations, plenty of room for future growth.
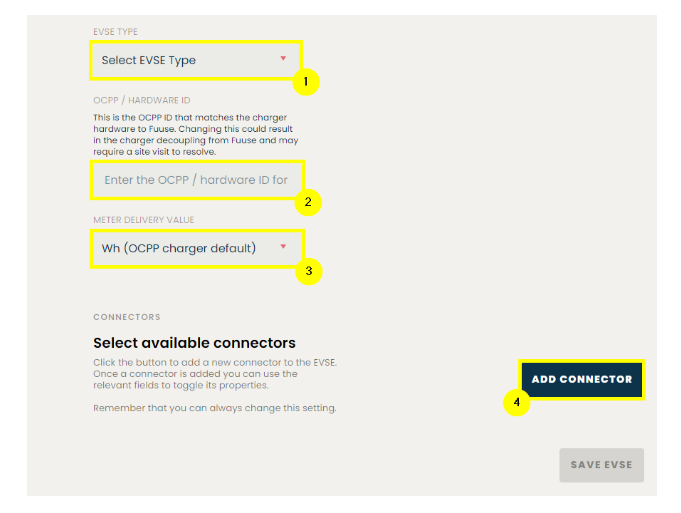
Continue down the screen to add more details:
1. EVSE Type - Select the appropriate EVSE type for the hardware you are adding:
- EO - Select this specifically when installing EO branded charge points.
- OCPP 1.6 - Open charge point protocol 1.6 is largely considered the standard for the majority of commercial EVSE's in operation at this time.
- OCPP 2.0 - While Open charge point protocol 2.0 isn't widely supported right now, it likely will be going forward.
2. OCPP / Hardware ID - This is the OCPP ID that matches the charger hardware to Fuuse. Changing this could result in the charger decoupling from Fuuse and may require a site visit to resolve. This can usually be found on the hardware itself, in the supplied documentation or passed on from the manufacturer. If you are unsure what it is or can't find it, it is best to contact the manufacturer for advice.
3. Meter Delivery Value - The delivery value will automatically change depending on whether you select EO or OCPP as your EVSE type, as they require a different value. If for some reason you wish to override the default, this can be done using the drop down.
- Joules - This is the default value used for EO chargers
- kWh - Kilowatt hour might be preferential for high capacity rapid chargers
- wH - Watt-hour is the most commonly used value and the default for OCPP EVSEs
4. Add Connector - Click here to add single or multiple connectors to your EVSE.
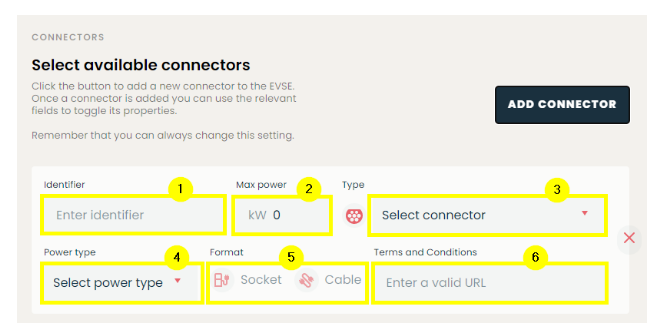
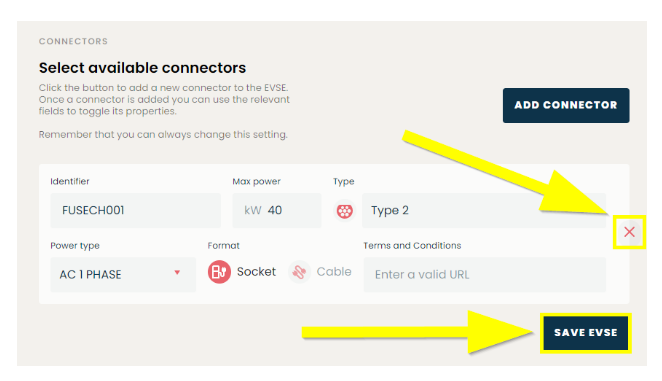
To complete the EVSE configuration, you must provide details of at least one connector present on the EVSE:
1. Identifier - This is the unique ID for the connector within the EVSE. For OCPP chargers this will always just be incremental for each of the connectors on the charger i.e. 1, 2, 3 etc. So for multiple connectors you would create an EVSE with a connector identifier such as "OCPP1" and a separate EVSE for the second connector, this one with an connector identifier such as "OCPP2".
2. Max Power - The maximum rated power output of the connector in kW.
3. Type - Select the connector type from the drop down box. The documentation from the manufacturer should inform you which is the correct choice for your EVSE.
4. Power Type - Select the power type from the drop down box. Again, the correct choice should be in the manufacturers documentation.
5. Format - Select whether your connector is in the form of a socket or a cable by clicking the relevant icon.
6. Terms and Conditions - If you have a website with terms and conditions for the use of your hardware, you can enter the URL here.
The EVSE configuration is now complete. If you need to remove a connector at any time, click the red X on the right of it.
Click the "Save EVSE" button to save the information you've entered. You may add additional EVSEs by repeating this stage of site setup process as many times as necessary.
Once you have added all the EVSEs present on the site, do not forget to click the "Save Charging Site" button. Failure to do so will lose all information added if you navigate away from this screen.
Your charging site is now ready to use. If you need to make a change in the future such as adding or removing EVSEs, this can be easily done by returning to the charging sites section and editing your chosen site.