QR code stickers are attached to a charger to offer your users multiple ways to use the service. This sticker can be sized, styled and branded however you want, but a few key elements must be present to ensure that it functions correctly.
This guide assumes you will be designing and printing the stickers yourself and have the appropriate knowledge and access to equipment. You will most likely require a graphics editor such Adobe Photoshop to arrange your design and to consult with a printing firm to produce the final stickers to your specifications.
As your stickers will most likely be placed on chargers outside, you should consider using a heavy duty high tack vinyl sticker that will be weather resistant. Speak to your printing company about what options they offer in this regard.
Contents:
- Creating Charger Names
- Spreadsheet
- Generating a QR Code
- Styling & Saving Your QR Code
- Arranging Final Sticker Design
1. Creating Charger Names
To begin, we need to create a list of all of your charger names to work from. This list can be referred back to in order to ensure no charger is missed.
If you haven't added any chargers yet, you can follow our guides on how to add them below:
Adding a Single Connector Charger
Adding a Multiple Connector Charger
All chargers connected to Fuuse have a unique name, not just amongst the chargers you manage, but out of every single charger on the platform, so bear this in mind when creating them. Using some part of your brand name is the best way to ensure the names are unique.
Charger names must be no more than 16 characters long and contain:
- Alphanumeric characters (ABC123)
- Hyphens ( - )
- Underscores ( _ )
Your charger name must NOT contain any special characters or spaces as it will be used for the web charging URL.
Charger names will also be saved in the case you originally enter them within the Fuuse platform itself, even though they are not functionally case sensitive. For example, the charger name could be entered as:
- fuusecharger01
- FUUSECHARGER01
- FuuseCharger01
However, the case only matters when creating your charger name for the purpose of how it will be displayed. If you wish to print the URL on the sticker with your charger name in a different case, this will still work as URL's themselves are not case sensitive. Charger URL's will be explained in more detail below.
Also consider the length of your charger name to ensure it allows room for growth as your operation adds more chargers. If we used the charger name "FUUSECHARGER0000", the four digits at the end allow for a potential 10,000 unique combinations, plenty of room for future growth.
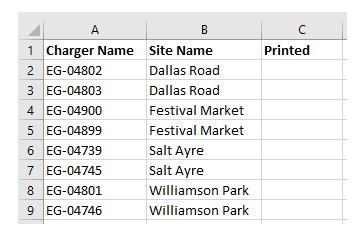
2. Spreadsheet
Open a blank spreadsheet in Microsoft Excel or your preferred spreadsheet software. We only need to add three headers here:
- Charger Name - Enter the name of your charger in the format you want it to display in the Fuuse portal, as discussed in section 1.
- Site Name - Each charger you create will exist in a specific site. It is useful to make note of this on the spreadsheet so you can group the chargers by site, making it easier to keep track of what has been done so far.
- Printed - This allows space to mark each charger as complete while you work through the process of printing your stickers. This is especially important if you have a large number of chargers to work through.
3. Generating a QR Code
We can now look at generating the QR code that will be used on the sticker for users to scan. These point to a specific web address for an individual charger at one of your charging sites.
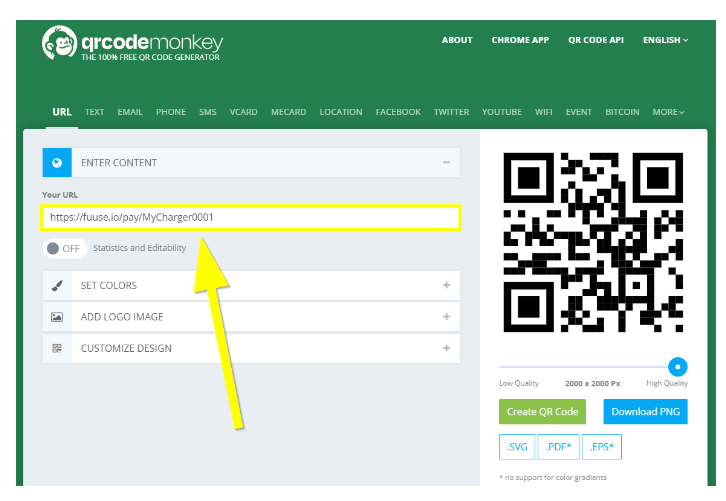
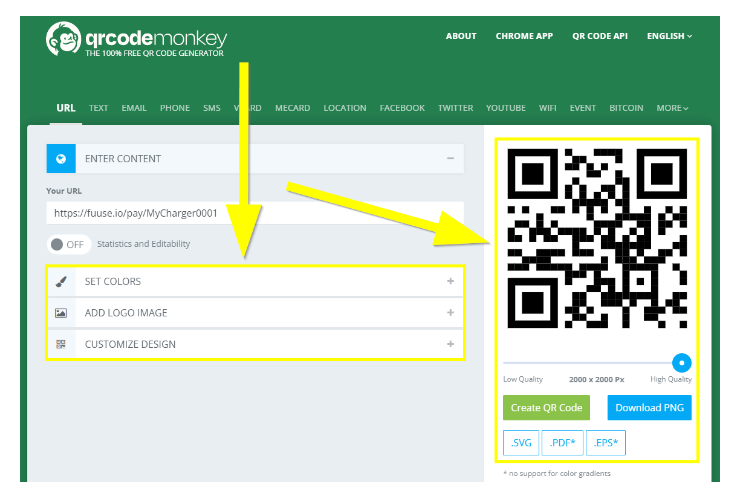
In this example we are using the free online QR code generator QRCode Monkey. There are many such online generators, so feel free to use which ever you prefer.
The most important part of this process is ensuring you enter the correct URL to point the QR code to the charger of your choice. The correct URL will be which ever you use to login to the web portal.
If your organisation uses our Fuuse branding, the URL will begin with:
You will then add the charger name to the end of the URL, ensuring to type it correctly using the list we compiled in the previous steps. The only exception here is the case as URL's are not case sensitive, so you are free to enter it in any combination of upper and lower case without issue. For example:
http://fuuse.io/pay/MyCharger0001
The exception to this is if you have a white labelled version of Fuuse. This could mean you use a different URL, usually based off your personal company branding. As above, this will be the URL you use to login to the web portal and will look something like this:
https://brandname.chargingsites.co.uk/pay/MyCharger0001
If you have any doubts what URL you should be using, contact us and we will confirm it for you.
4. Styling & Saving Your QR Code
The expandable sections under where you entered your URL will allow you to style the QR code to your liking. You can change it to match your company colours, add your logo to the centre and alter the body, eyeframe and eyeball shapes that make up the QR code itself. All of these options are purely cosmetic and have no baring on it's functionality.
Clicking the green "Create QR Code" button updates the preview to match any styling settings you have changed.
A slider allows you to select the desired quality level by pixel. As these are intended for print, it is good practice to set this as high as possible. A low resolution QR code might not print clearly which could lead to it being unreliable when scanning.
Once you are happy with how your code looks and is configured, click the "Download PNG" button. This will download a copy of the QR code to your machine in the PNG image format, which will be the most useful for creating your final sticker.
Repeat this process for every charger on your list in excel that we made in the previous steps. It is wise to name the QR code PNG file the same as the charger it is being assigned to. This will make it easier to keep track of which QR code needs to be added to which sticker later on.
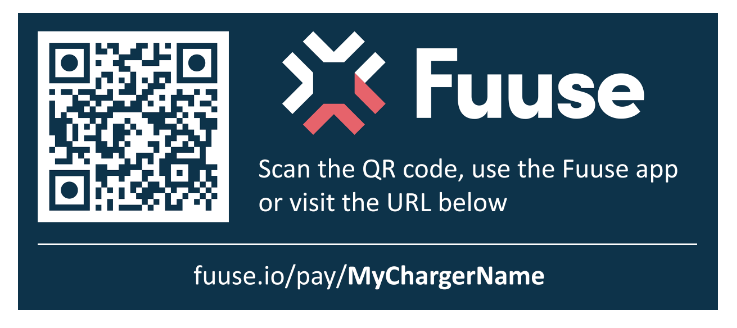
5. Arranging Final Sticker Design
When it comes to designing your final sticker, many of the choices will come down to your personal needs and preferences. Things like the size or arrangement of the sticker will depend on the physical space available on the charger itself. It is up to you to determine how much space you have, how large it should be and to have it printed in the appropriate size.
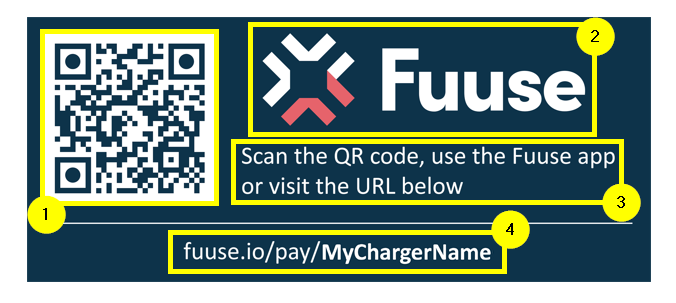
Lets take a look at the individual components that make up the sticker:
1. QR Code
Obviously none of this would work without the QR code itself. This should be large and prominent to ensure it scans well. Also, be sure to follow the steps above carefully to ensure you match the correct QR code to it's intended charger.
2. Logo
Adding a logo helps add a professional touch to the final sticker. Contact our team if you need a high quality copy of the Fuuse logo.
If your system is white labelled with your branding for users, you will most likely want to add your own company logo instead.
3. Usage Instructions
You should include a short sentence explaining to users what they should be doing and their options. As with the above, this will be largely dictated by your setup.
If everything the user sees is Fuuse branded, you can go ahead and copy the instructions from the example below.
In the case where the user would see a white labelled version of anything from the instructions, these should be altered to suit. For example, if the app has been white labelled for your company branding, you would instead state "use the [insert company name here] app".
If in doubt, always consider and check what the end user will be seeing, as this will determine how you need to communicate the choice to them.
4. Charger URL
You should also include the unique URL for the charger. While this is exactly the same URL that the QR code points to, it can be useful as a backup in case there is an issue preventing someone from using the QR code.
It is good practice to have the charger name portion of the URL in bold to allow it to stand out. You can also opt to write the charger name in all caps if you wish it to stand out more as URL's are not case sensitive.