Configuring Alfen devices requires a Windows laptop to be on the same local network as the charger. It also requires a Service Account from Alfen that might take several days to setup.
Request a service account from Alfen
- Visit this site and complete the form: https://aftersales.alfen.com/plugins/servlet/desk/portal/5/create/76
- This will create a ticket on Alfen's support system and they will create an account for you
Download the Alfen ACE Service Installer:
- Download the ACE Service Installer software from Alfen: https://alfen.com/en-be/media/980
- Open the application on your PC. It will likely download updates and profiles for different back offices. Make sure you say "Yes" to these.
- Login using the details provided by Alfen
Add the charger in Fuuse
- The full guide for adding a charger to Fuuse can be found here.
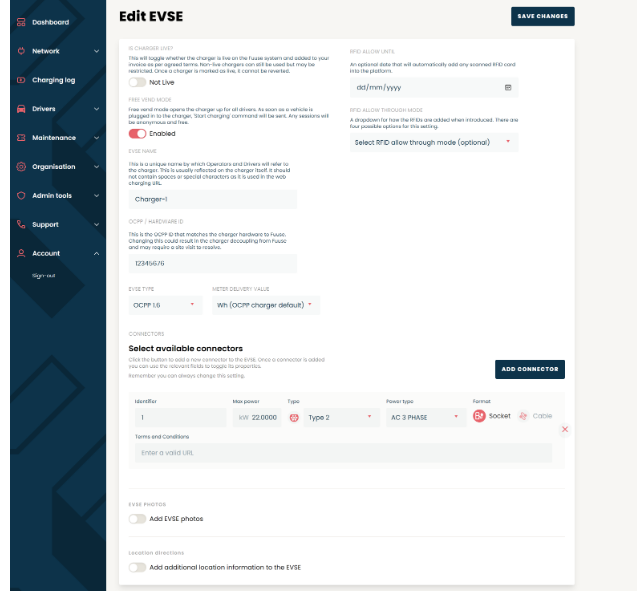
- For Alfen units specifically, you will need to obtain the OCPP ID from the ACE Service Installation tool and then add it to your charge in Fuuse. This will also be included in the documentation that comes with the Alfen charger.
- At this point, the charger is set up in Fuuse awaiting connection.
- Next we need to configure the charger itself to point at Fuuse.
Select Fuuse as the back office system
- In the ACE Service Installer tool, select the the relevant charger on the left
- You will need to enter the password for the charger itself. This can be found with the documentation that comes with the charger.
- Once you have logged in to the charger, click the charge point icon at the top of the screen:
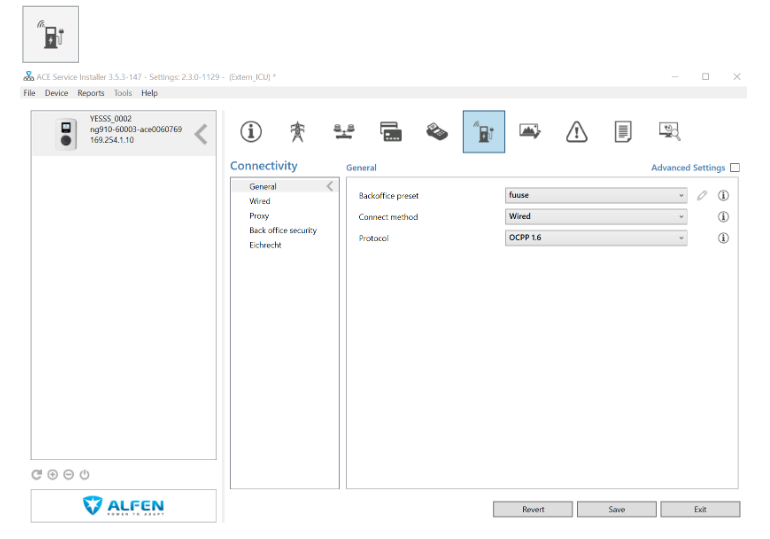
- Under the "General" option on the left, you will see an option called "Backoffice preset" with a drop down box. From the dropdown box, you can select "fuuse".
- You should also select the appropriate "Connect method" for the install you are performing (e.g. "Wired" or "Mobile") and make sure the Protocol is set to "OCPP 1.6"
- Click "Save" and, if prompted, let the charger fully reboot
- NOTE - if there is no "Backoffice preset" option, you'll need to manually configure the backoffice URL in the "Mobile" section, adding ws://hw.fuuse.io:9998 to the "Back Office URL" box and / to the "Back Office Path" box:

Configure sim card settings
- In the ACE Service Installer tool, select the the relevant charger on the left
- You will need to enter the password for the charger itself. This can be found with the documentation that comes with the charger.
- Choose the "Connectivity" tab at the top of the screen:

- In here, select "Mobile" from the left hand menu
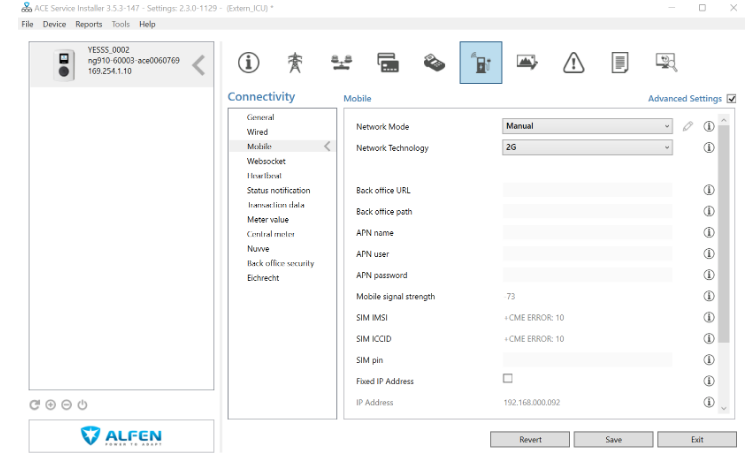
- From here you should be able to enter the network and APN settings for the sim card.
- If you are using a Fuuse provided sim card from 1NCE, the APN settings will be as follows:
| Setting | Value |
| APN | iot.1nce.net |
| Username | Not Required, Leave Empty |
| Password | Not Required, Leave Empty |
- If you are using a Fuuse provided sim card from Mobius/Telenor, the APN settings will be as follows:
Setting Value APN tel.mobius.cxn Username mobiustel Password mobiustel - Click "Save" and, if prompted, let the charger fully reboot
Making sure the charger has connected to Fuuse
- If the charger was setup correctly in Fuuse and is then configured correctly in the ACE Service Installer tool then upon rebooting the charger should connect to Fuuse. This will be reflected by the charger showing as "Available" and by heartbeats showing under the charger log in Fuuse.
- Alfen Specific Troubleshooting
- Alfen chargers can take a long time to connect to a mobile network after rebooting. If in doubt, please allow up to 30 minutes for the charger to find a signal and connect.
- There is detailed logging on the charger visible through the ACE Installer Tool that will tell you whether the charger has an active connection. Look for specific issues and errors in here.
- If the ACE Service Installer is saying that the charger has successfully connected but the charger isn't showing in Fuuse, it may be that the charger has connected with a mismatched ID. This will send it to our "Unmigrated Charger" holding area. Please contact Support to have this moved to the correct site.