This is a guide that shows how to install Fuuse on your charge point. If you want to connect your charge point to your Fuuse account, please follow the steps at the end of the guide
Please note that when you connect your charge point to Fuuse, we become the operator of the charge point. This means that you need to use Fuuse to control the charging process.
Ensure that your EO Genius 2 charger is powered up. The LED will remain white whilst the unit is booting up.
When the unit is powered up, the LED will pulse blue or green (depending on the Firmware version). You can now connect to the charger and accessing the user interface.
1. Connect your device to your charge point
The charger has an internal user interface which you will need to access to configure the charger, this interface is available via a Wi-Fi hotspot. The Wi-Fi hotspot is only available for 10 minutes after powering up the unit. You will need a laptop to connect to this.
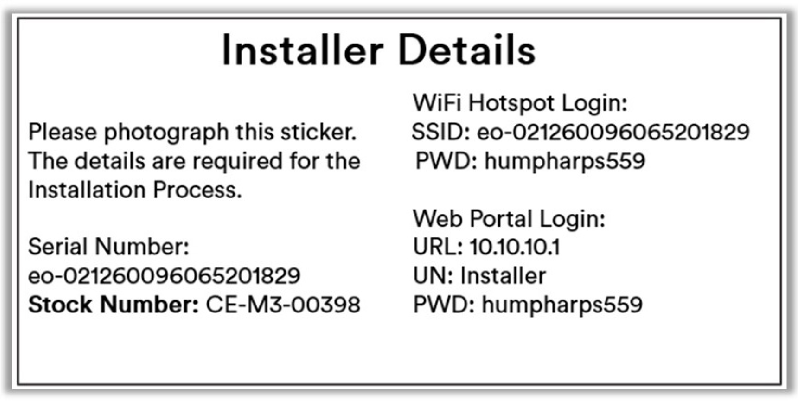
The hotspot name is represented as the charger's serial number, for example, eo-123456789110111 (the password for joining the hotspot can be found on the charger or on the inside of the packaging). The label will look something like this:
2. Open a browser to 10.10.10.1
Now when connected to the hotspot, open a browser and enter 10.10.10.1 and hit "Enter".

3. Login to the page
Login to the page, the 'login' will be "Installer" and the password can be found on the label stuck to the side of the charger packaging
Login: Installer
Password: xxxxxxx

4. Edit the CSMS settings
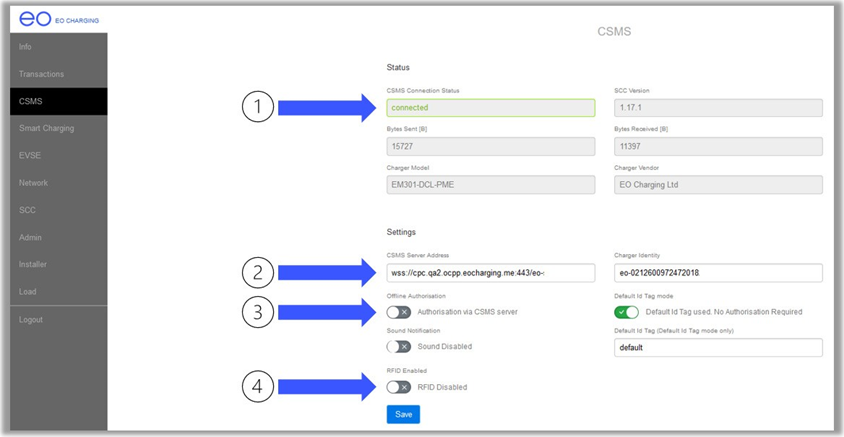
Navigate to the "CSMS" tab on the left side menu.
The CSMS Server Address is the connection URL of the OCPP server. A Fuuse websocket URL should be placed in this space to point towards the Fuuse Backoffice.
Set to the below parameters:
CSMS Server Address: ws://hw.fuuse.io:9998/
Charger Identity: use serial number of the charge point, without the "eo-"
Offline Authorization should be disabled/off
Default id Tag mode is disabled.
Default ID Tag: can be left as default
RFID can be enabled or disabled if required.
Click "Save".
5. Connect the charge point to the internet
Navigate to the "Network" tab on the left side menu.
In this example, we are connecting the charge point to the internet via WiFi.
Enable WiFi, using the toggle. Here you can either manually enter your WiFi credentials or scan for an available network.
Manually enter credentials
WiFi SSID: *your WiFi name*
WiFi PSK: *your WiFi password*
Scan for an available network
Click on the "Refresh List" button, located in the upper right corner of the screen.
Your WiFi network should appear. Select it and click on "Use as WiFi SSID".
Enter your WiFi password manually.
Click "Save".
6. Enter the "Admin" tab
Navigate to the "Admin" tab on the left side menu.
Click on "Restart" under the SCC client. Afterwards restart the EVSE.
Once the charge point has rebooted, you can continue to connect the charge point to Fuuse.
Please have the serial number of the charge point ready as you will need to add the charge point to the Fuuse portal.
7. Connecting the charge point to your Fuuse account
Now you need to add and connect your charge point to your Fuuse account.
You can do this through the Fuuse Portal using this guide (you may have this set up already or have requested Fuuse staff to do this for you).
8. Change the Charger Configuration Via Fuuse Portal
Log in to the Fuuse Portal and select the organisation and site you are working on.
Navigate to each individual charger and click "Actions" and then "Change Settings".
This will bring up the charger configuration screen (it may need a few attempts to load it).
Check the following settings and change if needed:
AuthorizeRemoteTxRequests – set to “1”
OEM_NoAuthEnabled – change from “true” to “false”
StopTransactionOnInvalidId – check it is set to “true”