Follow the procedure below to set up your laptop for use with local management for a Windows 10® operating system.
Notes
- You will need to contact Rolec to obtain the chargepoint(s) password. If the charger is already on the Fuuse network, please contact support@fuuse.io to obtain the password.
- A laptop and ethernet cable will be required.
The controller supports a locally hosted website that can be used for configuration, testing and analyzing purposes. Using e.g. a laptop, access can be gained by connecting the laptop to the Ethernet (LAN) port of the controller. An internet browser is used to start the local management website of the controller.
The connected laptop will have to be configured for setting up a connection
with the charging stations ethernet LAN connection. In short:
• IP address needs to set to 10.1.0.111 (fixed IP).
• IMCP (IP4); “ping” support must be enabled (Firewall setting).
The Local Management local website is best viewed using Firefox® or Google
Chrome® and is accessible on URL: 10.1.0.110 when connected.
1. Change your network settings
Here you need to change the network settings of your computer so that it has a static IP address that is on the same local network as the charge point.
- Click “Start”, select “Settings” and open the “Network & Internet” settings.
- In the left pane, select the topic “Ethernet”.
- Then on the left side click on "Change adapter options".

- Select the adapter to configure, then do a right-button click on it and select “Properties”.
- In the appearing window, Select the Internet Protocol Version 4 (TCP/IPv4) setting and click properties.

Adjust the IP address and the subnet-mask of the adapter to the following values:
▪ Use 10.1.0.111 as the IP address and
▪ Set the subnet mask to 255.255.255.0

Click on the "OK" button and close all settings windows.
For the configuration to work properly the adapter needs to be reset by unplugging and re-plugging the LAN cable.
2. Firewall settings
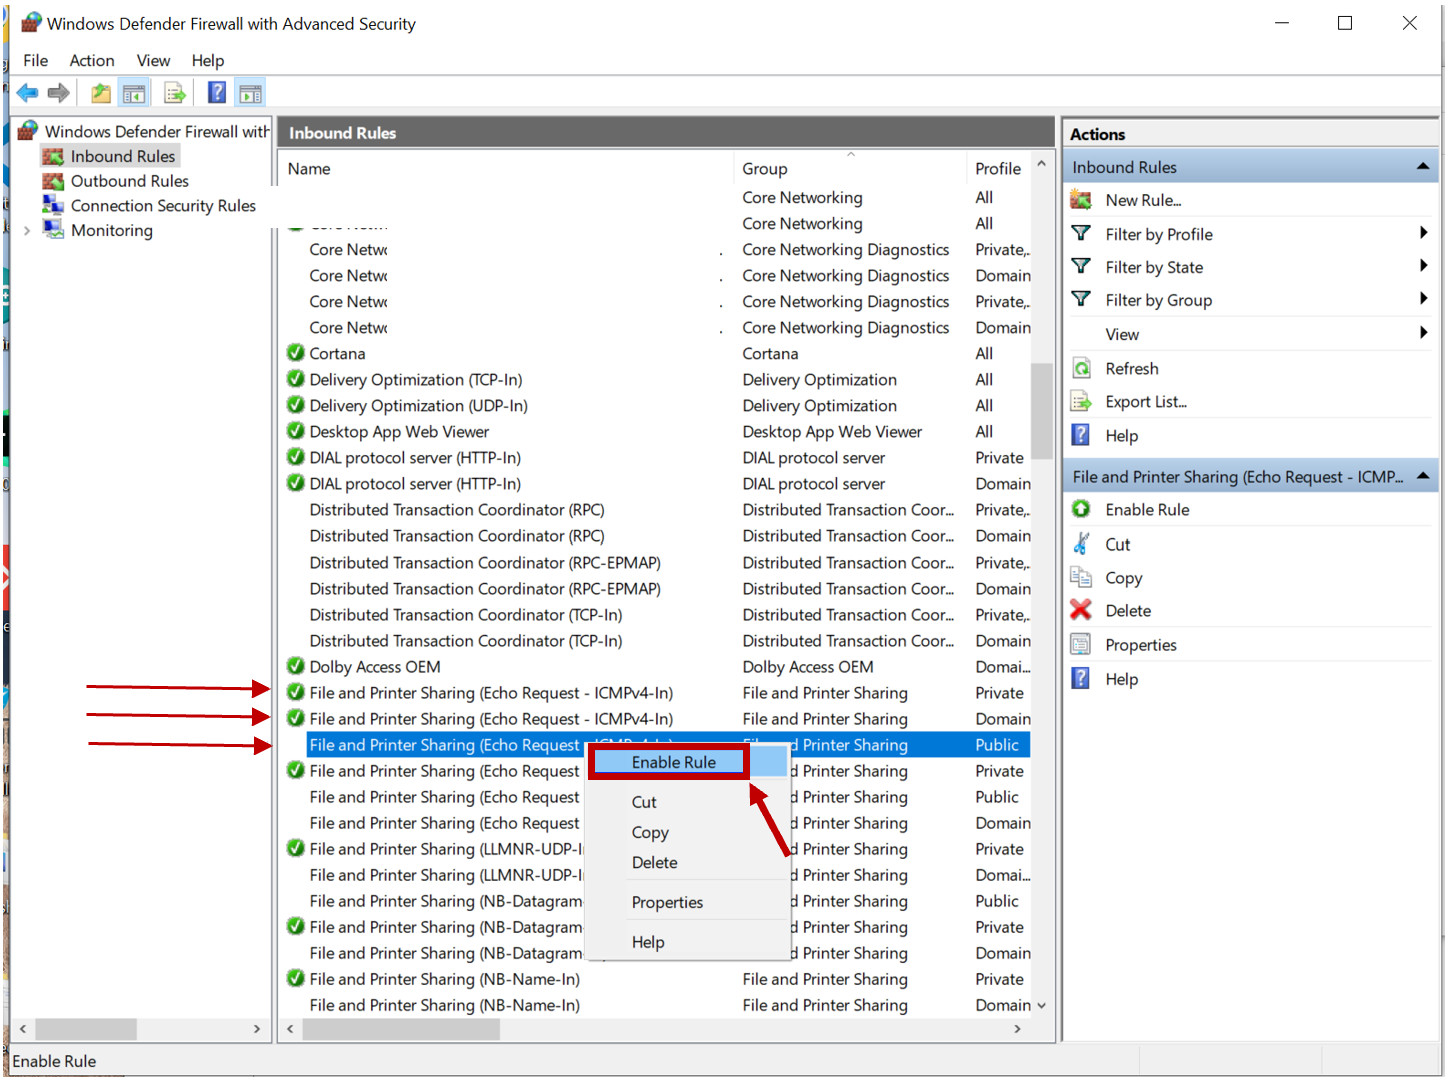
Click on the “Start” menu and search for “Windows Defender Firewall” (simply type in the start menu). Click on the “Windows Defender Firewall” icon that appears.

Open "Advanced settings"

In the appearing window, you should see 'Inbound Rules' in the left-hand panel, select 'Inbound Rules'
Then in the middle pane, look for the rules titled “File and Printer Sharing (Echo
Request - ICMPv4-In)”. Make sure that all rules for all the below profiles are enabled (by selecting the rule and clicking “enable rule” in the right pane). A green checkmark must be shown:
-
File and Printer Sharing (Echo Request - ICMPv4-In) - Private
-
File and Printer Sharing (Echo Request - ICMPv4-In) - Domain
-
File and Printer Sharing (Echo Request - ICMPv4-In) - Public
At this point your laptop is setup and can be used to access the Local Management functionality provided by the controller.
3. Connecting
Please ensure the charger is up and running, and use a standard LAN cable to connect your laptop with the controller using the LAN port of both the controller
and the laptop.
Note: Please allow 2 minutes after starting up the charging controller before connecting the laptop. Also, after disconnecting the LAN cable, allow 2 minutes before reconnecting again.
4. Logging in
Open up your internet browser and enter the IP address 10.1.0.110
The Local Management login page will now be shown.
You will need the password to the charger at this point.

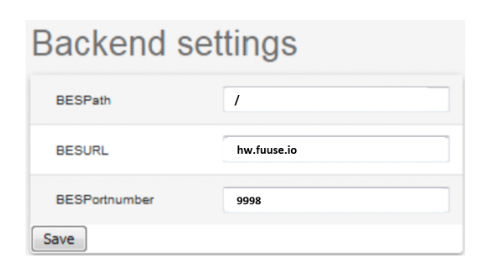
5. Configure the "Backend settings"
On the main page, look at the "Backend settings" section and ensure these are set ot the below then click save
BESPath: /
BESURL: hw.fuuse.io
BESPortnumber: 9998
6. Configure the "SIM settings"
Enter the correct APN according to your SIM card.
Fill out Username and Password if necessary.
Note: If you are using 1nce sim cards or Mobius sims provided by Fuuse please use the following APN settings:
For 1nce sims:
APN: iot.1nce.net
Username: Not Required, Leave Empty
Password: Not Required, Leave Empty
For Mobius Sims:
APN: tel.mobius.cxn
Username: mobiustel
Password: mobiustel

7. Reboot the charge point
After saving all of the changes, click on the "Reboot" command on top of the screen.

After your charge point reboots, you can check if your charger is communicating with Fuuse by clicking on the following link (please note you will need the serial number for this, normally begins with ROL):
https://app.fuuse.io/chargeronboarding
8. Connecting your charge point to your Fuuse account
If the charger is not set up on Fuuse, please contact support@fuuse.io and a member of the customer success team will help with setting up the charger(s) on your site.